M10 3-Inch Gun Motor
Carriage
Tank Destroyer
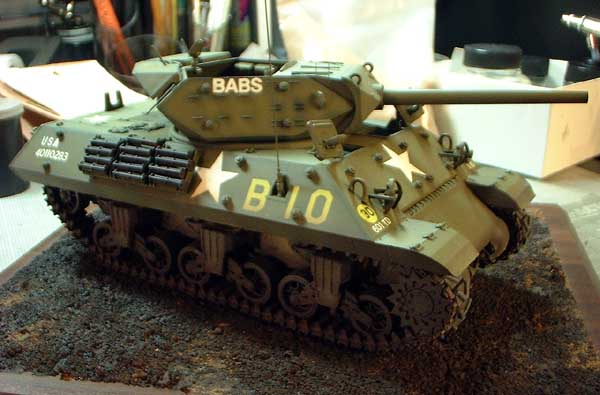
"Babs"
AFV Club Model Kit #35024
Copyright 2001 &
2002, Jim Lewis/GunTruck Studios
All Rights Reserved Worldwide
Some Images Appearing in
The Afterburner - Newsletter of the
Stockton Tomcats, October 2001
Edited by John Bergsing and Brad
Baumgartener
Digital Photos Taken By Rodney Williams
All Rights Reserved
|
|
AFV
Club #35024 is a great model - don't let
anyone steer you wrong. It seems that even
though we're living in a Golden Age as far
as armor modeling goes, with every new
release there seems to be even more
willy-nilly, nit pickers, who whine and
complain about every single release. If you
can't shake the box up and produce a
perfectly detailed and constructed model kit
- then it's time to complain. Model kits are
so well engineered, like Tamiya's releases,
that the novice has little difficulty
getting them together. This probably jades
most - as little is called for in the way of
skill, tenacity, and ingenuity when building
the model nowadays. It's as if most have
forgotten the lumps of plastic from the
1970's - and too the sheer pleasure of model
building - because that's what it took to
get them together and end up with a fine
miniature.
Yes -
there are some problems with the AFV Club
kit. The Turret is too wide - and plain
wrong as some purists feel - as the model
kit's hull better represents a
mid-production vehicle, but the Turret is
more representative of the revised later
version where one would find "Duck Bill"
counterweights mounted. The Road Wheels
might be a tad oversized but do look okay
when in place, the Hatches could be rendered
better (too square) and the Rear Panel is
questionable but not too noticeable in the
final product. I chose not to change these
details building this model kit.
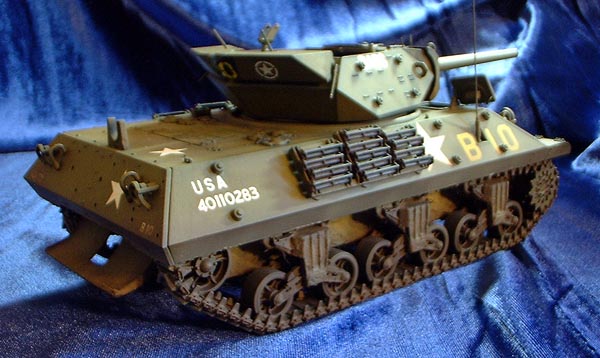
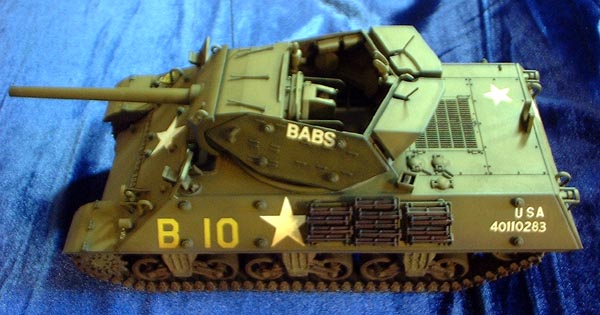
With a
little extra effort (plain old fashioned
model building) this kit can build up into a
wonderful addition to you miniature AFV
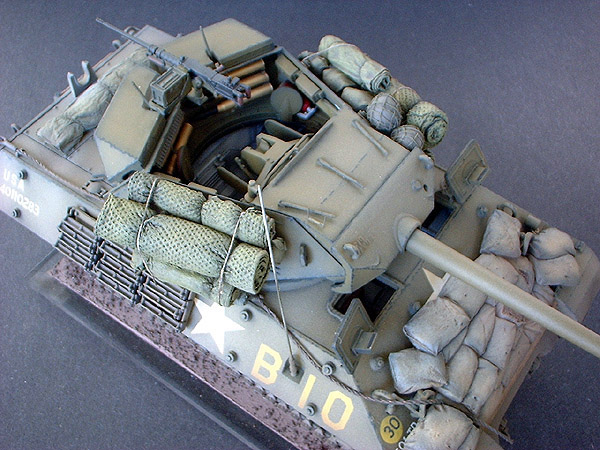
collection. For me, this was a double-treat,
as every five years I seek out a military
miniature to build that bore one of wife's
nicknames - "Babs". At our Fifth Wedding
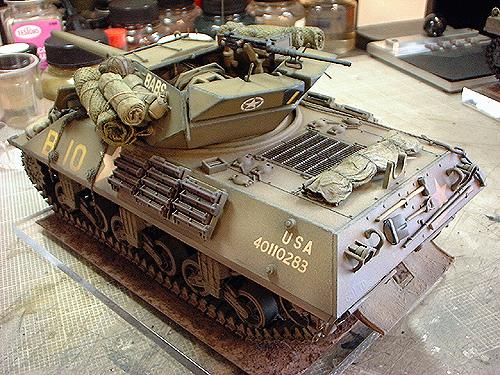
Anniversary, I selected to model the M10
Tank Destroyer "Babs" as she might have
appeared in Fall 1944 during the drive
through southern France.
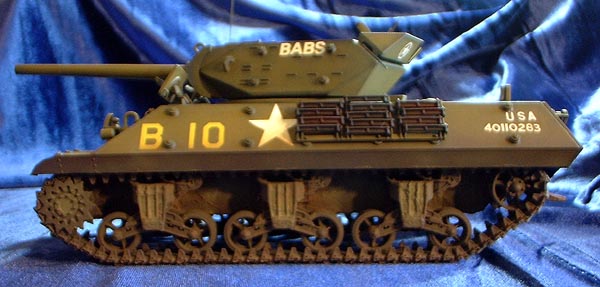
Using
a photo of "Babs" found in Concord's US Tank
Destroyers in Combat 1941-1945 I set out to
make some detail changes to the AFV Club
model kit as it comes from the manufacturer.
First off, I obtained two sets of RHPS T-48
Rubber Chevron Block track links to retrofit
to the model kit, as "Babs" is wearing these
in the photograph of the tank destroyer
advancing up a sandy beach. I needed two
sets of links because I didn't have enough
left over to model the spare track link runs
stowed on her glacis plate as a form of
supplemental armor.
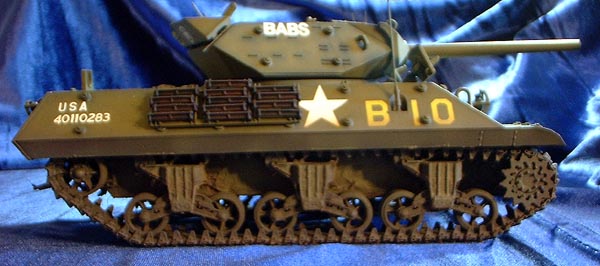
Secondly,
"Babs"
is wearing Wading Trunks in the photograph,
but I wanted to display her a couple of
months later, having moved inland in the
drive to liberate France. The AFV Club kit
does not come with Wading Trunks nor a
Exhaust Deflector Baffle common on these
vehicles - which I had to scratch build. As
these are flimsy, and were often torn away
by the crew after landing operations. They
also come in different varieties - giving
you an opportunity to set your model apart
from other M10 Tank Destroyer miniatures.
|
Beginning the Build
AFV Club's model kit's biggest nagging point
is that the wonderfully detailed Bogeys and
Idler Wheels don't have details on the
backsides! This deficiency in the Idlers is
most apparent when viewed from normal modeling
angles. It is perfectly acceptable to clean up
the ejector pin marks in the voids behind the
wheels and finish the kit as is, however, I
chose a different route - which works with the
AFV Club supplied Laced Drive Sprocket.

Academy's equally wonderful
model kit of the M12 155mm GMC comes with
two sets of Bogeys, Idlers, and Drive
Sprockets - open spoke and dished. Their
dished wheels have inserts for the
backsides! On happy day - both sets of
wheels are also drop-fits onto the AFV Club
Bogey Trucks. Since I had a choice, I chose
Academy's open-spoke Idlers and Bogeys to
fit onto my AFV Club M10 Tank Destroyer - to
go with the AFV Club Drive Sprockets.
Now, the only caveat here
was using the Academy Idler Wheels and the
RHPS T48 Rubber Chevron Track Links. In
order to get this combination to fit on the
AFV Club M10 Tank Destroyer, you'll have to
break out the battery-powered Dremel tool
and sand down the outer rim thickness of the
Academy Idlers. They were a bit too thick
and I couldn't slip the RHPS track links
between them and the sponson floor of the
model kit when it came time to attach them.
You don't have to remove too much plastic,
and take your time to rotate the wheel and
make sure it remains round. The end result
is so nice no one would know you thinned the
Academy Idlers unless you told them. The
RHPS track links set the model miniature off
too.
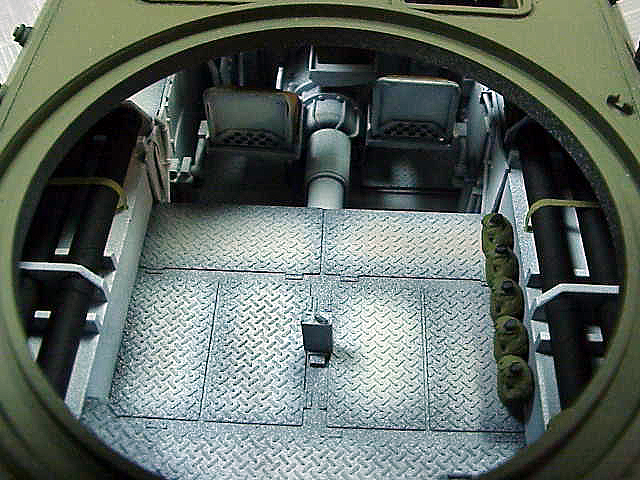
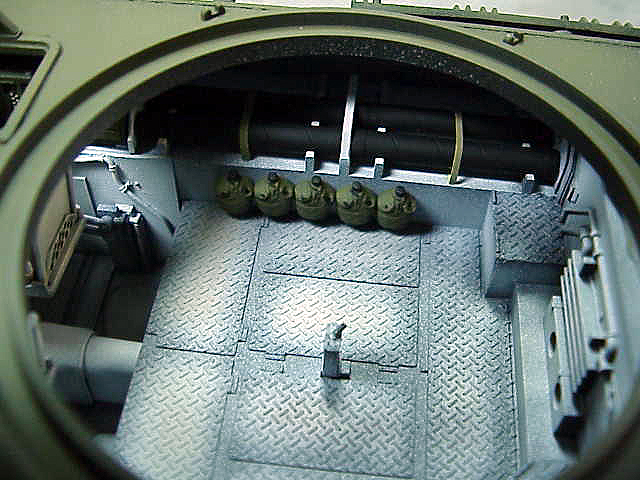
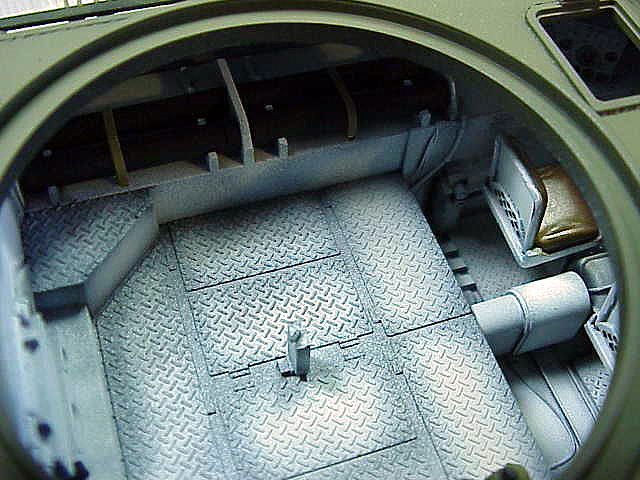
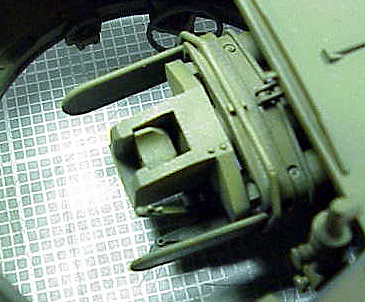
The four photos of the
Fighting Compartment interior were digital
images taken by Master Aircraft builder
Rodney Williams. All of this had to be
completed and weathered prior to mating the
upper and lower hulls of this miniature.
Naturally, I'd go back in the end assembly
and add small nick-knacks and other small
details easily reached through the Turret
Race. The electrical junction box in the
center of the Fighting Compartment floor is
made from scrap styrene strip. The five
canteens are Tamiya Infantry items.
Retaining Straps around the cardboard ammo
containers are made from 3M Post-It-Notes -
painted Khaki. I did rework the rear wall of
the Fighting Compartment, so that the
cardboard ammo containers would line up with
the holes over the Sponsons properly. The
Breech Area is essentially the same as the
model kit's details, except for a few small
bolts and eye-ring for the travel lock
mechanism. The center rail in front of the
eye-ring comes from AFV Club's stainless
steel M10 Detail Set.
|
Having cleared the big
hurdles in the project, the rest was simple.
Hobby Fan makes a nice interior detail set
for the AFV Club M10, but I decided to go
with parts from Legend Productions' Interior
Set. I used their side walls and floor to
replace the missing detail in the basic AFV
Club kit. I set aside their Transmission and
Fighting Compartment Assemblies for use in
another project. To the Legend Interior, I
only added Escape Hatch detail to the Floor.
A simple rectangle became a missing
Electrical Junction Box on the center floor
of the AFV Club Fighting Compartment - to
which I would later connect in the end
assembly.
I replaced AFV Club's Radio
with one from Verlinden, and added some
minor detailing of my own in the Fighting
Compartment that basically adds depth to an
already great amount of detail. Little else
is called for to satisfy even the most
finicky of modelers. Missing from the AFV
Club kit are small items - like a First Aid
Kit and the M2 Chemical Decontamination
Apparatus. The First Aid Kit came from
Verlinden - and decaled with the item from
Archer's dry-transfer set. The M2 Chemical
Decontamination Apparatus comes from Tamiya.
The five Canteens suspended on the right
sponson wall are Verlinden items. For
another touch, I added a Tamiya M3 'Grease
Gun' Sub-Machine Gun to the gear inside the
co-driver's compartment.
A Thompson Sub-Machine Gun
is mounted, with foil clips, on the upper
rear of the Turret - on the outside of the
spare ammo clip box. The Tommy Gun is a
Tamiya item. An Italeri Helmet, with
scratchbuilt foil Liner and Straps joins the
other details in the miniature's interior. I
scratchbuilt three Signal Flags to stow on
the upper left side of the Turret out of
pre-painted tissue. Red, Orange, and Green,
I wet the pre-painted tissue with a mixture
of white glue and water, rolled and shaped
them, and when dry, I mounted them in place.
AFV Club doesn't give you
3" ammunition to supply the Ready Racks in
the Turret. This leaves the area quite bare.
They recommend utilizing their brass 76mm
ammunition detail set, but this isn't quite
right for the M10. I used Kendall Model
Company's 3" Ammo Set to add this detail to
my model. KMC's original set is difficult to
find, but Warriors makes a set you can use
for your M10 miniature. Spare .50cal and
.30cal ammo cans are Verlinden items.
To finish it all off, I
also purchased AFV Club's M10 Etching Set
too. This stainless steel set is nice - with
an incredibly small Gun Sight Vane - but at
times quite tricky to use. The stainless
steel isn't as pliable as the brass I've
grown accustomed (spoiled) to in an Eduard
detail set. Here, I only used a handful of
parts to add to the kit, and totally went
away from using the stainless steel straps.
Here, paper works much better.
|
|
Finishing and Weathering
I painted the RHPS track links with Tamiya's
new NATO Black. This is a very nice
weathered black finish that's perfect for
simulating rubber on tires and track links -
as well as mimicking the modern US AFV
color. I varied the colors used for the end
connectors, some were painted Tamiya
Metallic Grey, and the rest were painted
Testor's Model Master Metallic Graphite. I
wanted to vary the tones of the end
connectors, and when I put them one, I did
so in a random manner. When the model was
weathered and dulled out, the little
variation breaks up the uniformity and adds
a little more subtly in depth of the details
already present in the miniature.
I
did not glue the end connectors to the
rubber track blocks - so nice was the fit in
the RHPS set. However, leaving them flexible
like this means you have to take extra care
in getting the alignment proper. It took a
long time to paint and assemble the runs,
but it was worth it in the end. Once applied
to the model, and the running gear suitably
weathered - I drybrushed the chevrons with a
mixture of Ivory Black and Zinc White oil
paint - to simulate the worn rubber that
contacts the ground. Another subtle tone to
add to the finished product.
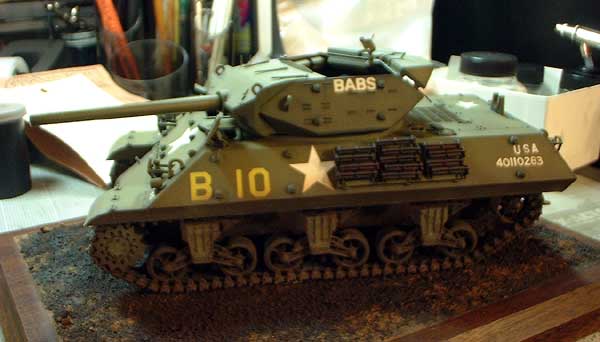
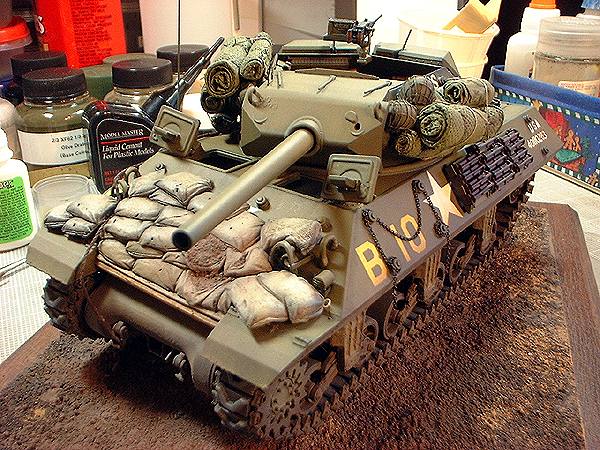
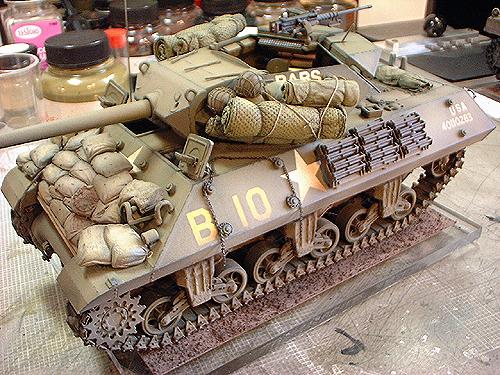
| Posed
on her display base while the
earthwork is beginning to dry,
"Babs" is still without its external
stowage. I like to mount the model
on a base before going to this step
- so that I can handle it better -
and keep my mitts off the model as
much as possible. Her display base
is a little oversized for my
preference too, but will work fine
in the end. |
|
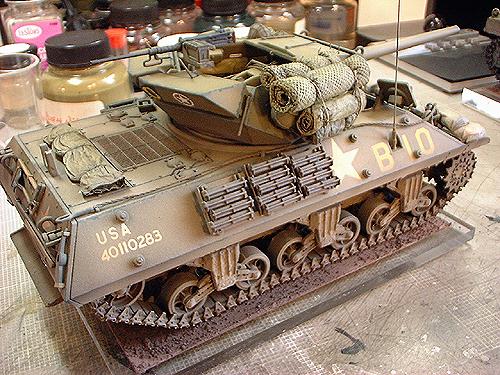
The
exhaust deflector does not come in the AFV
Club kit. I scratchbuilt one to add more
character to this miniature. These items
were pretty flimsy in reality, and took
quite a beating. They came in different
shapes and varieties, so you have a little
leeway in fashioning one for your model.
Mine appears a bit long, but I decided
against changing it because I like the way
it looks. That's what's important
ultimately. The Academy Idler Wheel shows no
sign of the sanding I performed to reduce
it's diameter to get the RHPS tracks to fit
on the kit.
The
AFV Club kit, sadly, comes with no external
crew gear to add to your completed model. No
problem for me, but I have a pretty
well-stocked detail box. The basic external
equipment is provided, however.
I
opted to go with a combination of my own
scratchbuilt items, and some nice
after-market items. Verlinden's external
stowage was a welcome addition to my
miniature. I used their rolled tarps, along
with mats to place underneath sleeping bags
made by AEF Designs.
Before
the final dull coat and attaching the
external stowage and equipment, I deftly
applied a mixture of Hudson & Allen Mud
with a generous amount of grass clippings
from their Summer Grass packet, to the
underside of the Hull and around the running
gear. I say deftly because I applied a good
amount - careful not to obscure the detail
present in the basic model kit's moldings. I
can't bring myself to glop on the mud, but
did apply it where it would normally collect
in, around, on, and between the suspension
components. Doing this weathering step is
almost an art unto itself - so that you
convince the viewer that this is how a
typical vehicle of this type looked in the
field, while satisfying the finicky contest
judge that you really aren't hiding a flaw
or two in a bunch of goop.
My
favorite technique when using Hudson &
Allen Mud is to apply the mixture to the
portions of the miniature where I want it.
When dry (probably 15 minutes to a
half-hour) I spray the newly muddied area
with a dull coat spray. This changes the
'color' of the mud to a 'wet' appearance.
After the dull coat sets, I go back and add
patches of a new mixture of Hudson &
Allen Mud to various spots on the Hull. This
creates patches of dried mud amongst the wet
mud. I do this at the end of the miniature's
end assembly - so I'm not tempted to shoot
more dull finish on it. This will change the
dried mud to a 'wet' appearance again. Vary
your sequence and you'll be pleased with the
end result. Mud should never be applied
evenly nor uniformly.
Finishing
all
of this off is a light dusting around the
lower hull and suspension. First is a dirty
mixture of grimy black - literally from the
well-used thinner on my workbench that cuts
a 1/3 Tamiya Flat Black and 2/3 Flat Brown
by 70%. I don't know what to call the ruddy
color I get, but I airbrush this on first.
It's the consistency of thinned milk. It
dries dirty brown. Road dust is simulated
with a very light airbrushing of a 50%
thinned combination 1/2 Polly S Dust to 1/2
Polly S Mud. In the end, my lower hull and
suspension areas are a different color that
the upper hull and surfaces of the miniature
tank - the desired result. I mix it up
differently for each miniature, so the tones
and end results are different per model.
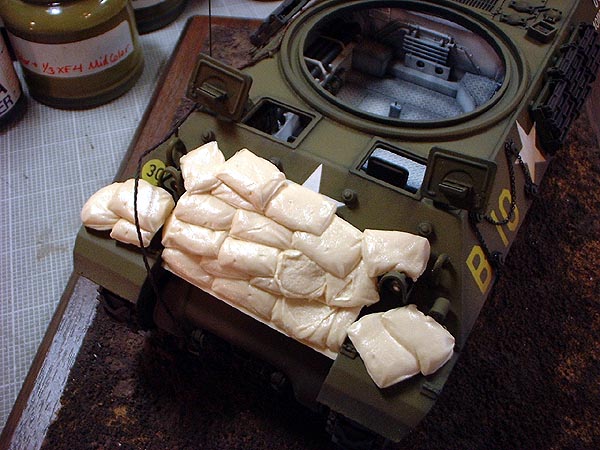
I
decided to remove the previous stowage I had
on the Glacis Plate to try out portions of
the new Hobby Fan (#HF014) M10 Accessories
and Sandbags set. Photos below are of the
bare resin to show you the fine detail they
cast into their parts. Luckily, I made
everything easily removable, so that
retrofitting these parts to my miniature
wasn't a difficult task.
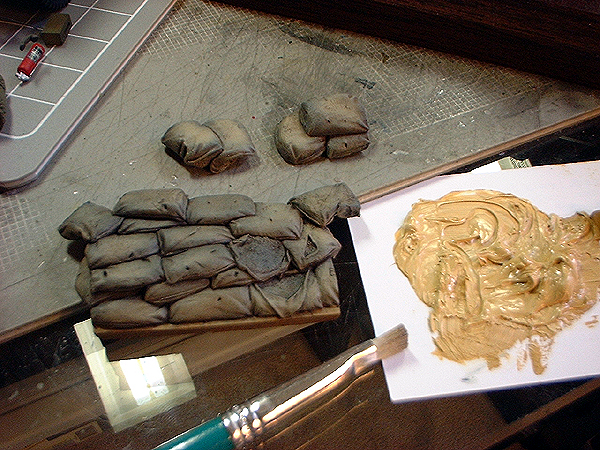
This
is the Hobby Fan M10 Accessories' sandbags
all painted up and weathered. It is a
wonderful resin casting - note the bullet
holes and torn bags. I painted this with a
base coat of Tamiya Flat Black. Then I
over-sprayed in a thin cloudy pattern with
Tamiya XF-57 Buff for the basic sandbag
color. I brush painted the wooden dam Tamiya
XF-60 Dark Yellow to simulate a pine board.
To this I would add another simulated pine
board - made from a length of coffee stir
stick - painted to match. After drying for
about 30 minutes, I washed the parts with a
mixture of Raw Umber oil paint diluted with
Turpenoid. This doesn't react with Tamiya
acrylic paint, allowing you to move pretty
fast. After allowing the oil wash to dry for
about 30 minutes, I removed most of the wash
with a brush dampened in Turpenoid, leaving
it in the recesses for depth. I let the
whole sit for two hours, and then made up a
drybrush highlight with oil paints - seen
above. The mixture is 80% Zinc White and 20%
Yellow Ochre - mixed until it was pleasing
to my eye, and then applied with the flat
brush captured in the photo.
When
the whole was dry, I attached it to the
model. The dirt inside the torn bags was the
same as applied to the display base - to
match. I wet the torn areas with diluted
water / white glue mixture, and sprinkled
the earth powder into the area. When set, I
lightly brushed away the excess.
All in
all, this was a fun, but involved miniature.
I set out to make it a fun 'weekender' but
it turned into a build that took some time.
I wound up finishing other projects between
sessions with this one. It wasn't because
the model kit was difficult to assemble - it
was because the basic AFV Club offering is
so nice that it compels you to 'do just one
more thing' to it in every step. It goads
you into AMS quickly. I'd get bogged down,
swimming in ideas so something else to add
to the miniature, and wound up putting it
aside to take a breather. I highly recommend
the model for building - just be ready for
the ride it can take you on...
|
|
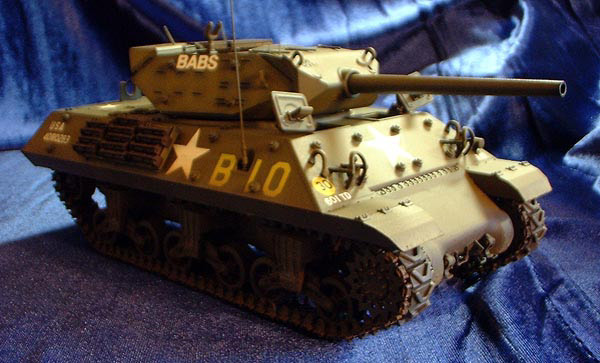
Update: September 2002
I pulled my M10 Tank
Destroyer out for a little cleaning and
decided to paint chip and weather the model
a little bit more - and mounting it on a
more compact display base. I think the
weathering served to give the miniature a
little more character, though the effect is
subtle. There aren't many lines on the M10
that will jump out and grab you, but the
weathering will draw you in a little closer.
|

|
All
content Copyright 1998 -
2019 Jim Lewis, guntruck.com, guntruck.us,
guntruck.org, guntruck.net and GunTruck Studios.
All Rights Reserved Worldwide.
|